Duration to Harvest: 6 - 7 days
Ingredients:
- 1/2 Tbsp of Red Clover Seeds (organic)
- 1/2 Tbsp of Broccoli Beans (organic)
- Water
- In a container (glass bottle or plastic box that can places food), put in both seeds.
- Add in water (never use boiled water because the seeds need oxygen from the water) to fill the container into half-full.
- Leave the container in a dark place & away from light (make sure it is not covered) for 8 hours or over night & allows germination process.
 Mix both red clover & broccoli seeds makes the sprouting easier (broccoli seeds need more care than red clover).
 How much of seeds depend on the size of the container.
 For this glass bottle, I fill it with a layer of seeds covering the bottom.
 Remember not to put in dead water (boiled water).
  More than half will do.
 Leave it for 8 hours.
 Steps (Day 1 - after 8 hours):
- The water turns yellowish & you can see the dirt. Also, the seeds become a bit bigger than before (the seeds absorb water & prepare for sprouting).
- Pour out the dirty water & drain the seeds (you can cover the lid with a cloth that has very tidy holes to avoid you accidentally pour the seeds out).
- Pour in water & shake the bottle (like washing the seeds), then drain the seeds.
- Wash the seeds & drain them again.
- Leave it uncovered in a dark place overnight.
 You can place the cover on the lid, without closing it to prevent unwanted dirt.
 Must wash & drain twice to discard the dirt.
  You can shake the bottle to distribute them evenly.
 Seeds become bigger after germination process.
 Steps (Day 2 - day & night):
- Some seeds start sprouting in the container.
- Wash & drain the sprouts twice in the morning.
- Leave it uncovered in a dark place.
- At night, wash & drain the sprouts twice.
- Leave it uncovered in a dark place overnight.
 Broccoli seeds may sprout slower than red clover seeds.
 You need to be careful when you drain the seeds.
  The seeds will become too wet if you did not drain them well.
 Steps (Day 3 - day & night):
- You may see some fury stuff with the seeds (it is the broccoli sprout). Also, some uneasy smell from the sprouts (broccoli sprouts have a stronger one).
- Repeat the steps you have done in day 2 - wash & drain.
 The sprouts grow bigger in day 3.
 And sometimes squeeze together for more space.
 Normally the bottom ones will get wet a bit.
 Whereas the top ones are dry.
Steps (Day 4 - day & night):
- Repeat the steps in day 3 for day & night.
 Almost ready to.
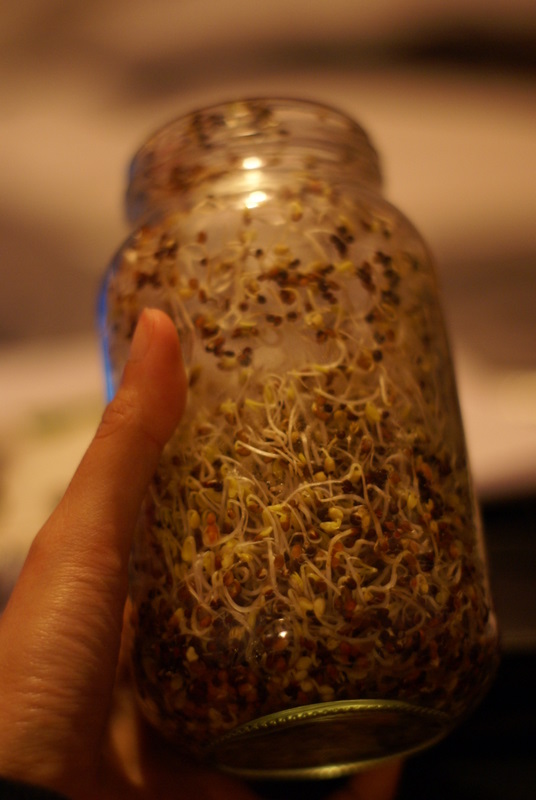 You can transfer the sprouts to another container to discard the hulls as well.
 Still growing.
- Wash & drain the sprouts twice.
- Now, you can transfer the sprouts into another container.
- Leave them in a place that has light source (but not directly sun-light).
- The sprouts can be consumed within day 5 & day 7 (depends on your preference).
 Again, make sure they are well-drained.
 It is difficult to separate the hulls.
 You can enjoy your healthy sprouts anytime you want.
 Red clover sprout (on right) has a simple leaves.It is good in lowering cholesterol, improving urine production & blood circulation (reducing the possibility of blood clots & arterial plaques) & limiting the development of benign prostate hyperplasia. Also, it is used for hot flashes/ flushes, PMS, breast enhancement & breast health, & help to prevent osteoporosis. However, it has side effect also (http://menopause-herbs.femhealth.net/red-clover-benefits-side-effects.htm).
  Broccoli sprout (on left) has leaves like apple shape. It contains cancer-protective compounds (sulforaphane). Three-day-old of broccoli sprouts contain 10-100 times higher levels of glucoraphanin (the glucosinolate of sulforaphane) than the mature plants. Also, it contains Vitamins A, C & E, calcium & fiber, among a long list of nutrients.
 I found that it is much more easier to sprout on some flat surface, especially on transparent container.
 The sprouts spread evenly and grow tiny (you can see the roots also).
 And, it is easy to drain by using a fine sieve.
- In order not to waste too many water, you may use the 'dirty water' to water other plants.
- You can start another sprouting in day 3 or 4; depends on your demand.
- You can get some organic seeds from some Internet stores if it is difficult to find in your place.

1 comment:
Thank you so much for the helpful pics and info. I grew mine in dirt thinking i would dig them up. Now they are just growing into plants lol.
Post a Comment